Friday 29 October 2010

Natural Handmade Soaps

The range of handmade soaps available on my website has been updated including some new additions.

Natural Handmade Soaps

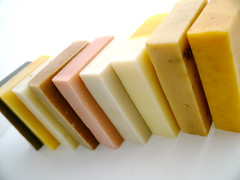
Ylang Ylang & Orange - This soap has a warm, two-tone effect to complement the combination of sweet, heavy, sensual Ylang Ylang and the light freshness of Orange. Generous helpings of Extra Virgin Olive Oil and our wild-grown Shea Butter provide luxurious moisturising qualities.

Nettle & Mint - Nettles have long been used in herbal medicine for a variety of skin conditions. Home grown nettles harvested in late spring are combined with sprigs of mint to give a fresh herbal soap. As well as olive oil and shea butter, added avocado and castor oils give extra creamy smoothness while a touch of peppermint essential oil provides the fragrance.

Lemon, Mango & Ginger - This soap is really fresh and spicy, as well as being an excellent moisturising bar. There's plenty of Olive oil, moisturising Mango butter, Lemon and Ginger essential oils. To give the soap a little extra something special, also added is some finely chopped fresh root ginger. Infused Annatto seed gives it its golden colour.

Seaweed & Aloe Vera - Seaweed is full of essential minerals and is renowned as a skin revitaliser with healing, nourishing and detoxifying qualities. This soap contains kelp and carragheen, soothing and gentle organic aloe vera and a moisturising mix of Extra Virgin Olive Oil and wild-grown Shea Butter. The fresh ocean fragrance comes from a combination of Pine, Rosemary and Peppermint essential oils.

Also available...

Tea Tree,Peppermint & Patchouli; Double Mint & Poppyseed; Rosey Geranium & Ylang Ylang; Lavender & Rosemary; Citrus Burst; Lime & Patchouli; Spicy Orange; Soft Lemon.

Last day to enter!

It's the last day to enter the giveaway from CSN Stores!

Read this post for details of how you can win a voucher to use at any of their online stores!

Lisa x

Thursday 28 October 2010

Hassop Station

Yesterday we had a rare day off so thought we'd make the most of it and visit a pretty new cafe which opened not far from us.


Situated on the Monsal Trail, this old station building has been transformed inside and out. The beautiful building of The Hassop Station has many old features and with it's mis-matched tables and chairs, a great setting for the delicious food we ate. There is plenty of seating inside and out. I can't wait to experience a summers lunch sat overlooking the scenery of the Monsal Trail.


Alongside the cafe is a bookshop containing a wide selection of fiction, non-fiction and children's books. There is also a small section containing shabby chic gifts. There is also a selection of Christmas decorations and cards available at the moment.

After lunch, we went for a short walk along the Monsal Trail. The pretty colours of the autumn trees made an ideallic setting for an afternoon walk in the sunshine.


The tunnels on the Monsal trail are opening in the Spring too which means you'll be able to walk or cycle from Bakewell right through to Buxton.

If you're ever in the the Derbyshire area, I would definetly recommend a visit.

Lisa x

Tuesday 26 October 2010

DIY: Easy Halloween Spider

There's only a few days now before Halloween. This felt spider is so easy to make and would make the perfect addition to your Halloween decor.

Felt Halloween Spider

Supplies:

Black felt
Black cord
2 White buttons
Black cotton
White ribbon
Toy stuffing
Needle
Scissors

Instructions:

1. Cut out two ovals from the black felt.

2. Onto one of the ovals, sew your buttons in place for the eyes.

3. Cut 8 pieces of cord for the legs. Pin your legs in place around the edge of the spider front. Your legs will need to be pinned so that the longer length of the legs is over th felt body. This will mean they are the right way round once your spider is turned through.

4. Pin your ribbon in place at the top of your body. Again, the length of ribbon will need to be ontop of the felt body.

5. Place the other felt body over the top so that the legs and ribbon are all inside - you will only see the ends poking out from the felt body. Sew around the edge leaving a small gap at the bottom.

6. Turn the spider through, your legs and ribbon should now be the right way. Stuff your spider and sew the bottom up.

Hang your spider in a spooky setting where everyone will see it.

Lisa x

Purple Love

I'm in love with this colour at the moment. It's a perfect colour for autumn.


1. Living room 2. Pretty hearts 3. Stunning Wall 4. Stormy clouds
5. Polaroid 6. Purple Love 7. Dining room 8. Woodland walk
9. Perfect pout 10. Bag 11. Purple clothing 12. Cute phone
13. Cake pop 14. Bedroom 15. Sparkly eyes 16. Feature wall

What colours are inspiring you at the moment?

Lisa x

Monday 18 October 2010

Our Special Autumn Day...

John and I have decided that in two years, we will be getting married! We'll be getting married at the end of October so what better theme for our wedding than Autumn.

All the fiery rich reds, burnt oranges, chocolate browns and deep purples. I cannot wait to start creating! I have images in my head of falling leaves, raffia, conkers, acorns, berries, twigs, rich wool felt, gold accessories, cinnamon, apples and candles.

I've started collecting some photo inspirations. I thought I'd share them with you...


It's going to be so hard making those final decisions!

Lisa x

Thursday 14 October 2010

Giveaway from CSN!

Remember that giveaway I did in July? Well the people of CSN are being generous and offering another £25 gift voucher to one of my lucky readers!

From wardrobes to pots and pans, lighting to wall art, CSN has everything for your home covered.

Just look at the things I came across that you could put your £25 voucher towards...

This Autumn Tree wall art would look gorgeous hung in any room of the house - perfect for this time of year.

This Children's Baking Set would make an ideal gift this Christmas.

Need a pretty bag to brighten up that shopping trip? Try this Polkadot Shopping Bag.


What about totally spoiling yourself with this Raspberry Kenwood Stand Mixer? I know this is certainly on my wish list!


Want to know how you can win that £25 gift voucher? Just leave a comment on this post - simple as that!

Or for extra chances to win become a follower, tweet about this giveaway, or blog about it. For every option you do, please leave a seperate comment on this post with a link to where you posted about it.

A winner will be drawn at random from all those who entered. Leave your comments here by 11:59pm (GMT) on Friday 29th October to enter!

Sunday 10 October 2010

DIY: Birthday Book

Here's a pretty organisation project. Not only can you record all your friend and family birthdays on the calendar pages, each month is also an envelope for you to store cards in until you send them!

Birthday Book

Supplies:
14 Brown envelopes (I used A5 but you could make a larger A4 one)
2 pieces of card (same size as your envelopes)
A4 paper
Patterned paper (I only used 1 double-sided sheet!)
Coordinating cardstock
Ribbons & braids
Paint
Tissue paper
Vintage Buttons
Border Punch
Bind It All machine & wires
Alphabet Stickers (+/or computer)
General craft tools and adhesives

The DIY:

Birthday Book Detail

Put your pieces of card inside two of your envelopes and seal - these will be your covers. For the other 12 envelopes, stick the tabs of the envelopes inside the envelope to create a pocket.

Birthday Book Paper Flower

To create the paper flower - cut lots of circles from tissue paper. Using a circle paper punch will make this easier. Stick them all together in the centre and stick a vintage button on top. Crumple up all the layers of tissue paper to give your flower shape.

Birthday Book Cover

Decorate your front cover. Cut a piece of patterned paper and punch along the bottom edge using a decorative punch. Stick this in place on your cover. Add a piece of braid and a piece of ric-rac, your paper flower, more vintage buttons and your alphabet stickers.

Birthday Book November

Create a title for each pocket using a couple of pieces of patterned paper/cardstock, braid or ribbon and a title. These were printed on the computer, cut out, and a hand-drawn border added. You could use more alphabet sticker, stamps or rub-ons if you wish.

Birthday Book January

To make your calendars, cut pieces of white paper to fit your pockets. Hand draw a grid of 5 boxes across and 6 boxes down. For months with 31 days you wil need to split the bottom right box with a diagonal line. Write, stamp or stick on numbers for the days of the month.

Birthday Book April

Using your Bind-It-All, bind all your pages and covers together to create your book.

Lisa x

Sunday 3 October 2010

Autumn Inspiration...

Some of the reasons why I love the autumn...

...the pretty autumn colours...

The beauty of autumn colours

...pumpkins...

Pumpkin

...squirrels hunting for nuts...

Anybody want a game of Conkers???

...walking in the leaves...

Autumn Beech

...conkers falling from the trees...

Conker

...fab wooly socks...

Silk Garden Lite Socks

...warm and stylish knits...


...the season for homemade apple crumble.


Why do you love the autumn?

Lisa x